U.S. Ground
Parcel Shipments
See Shipping Policy

Enclosure Backplates & Panels

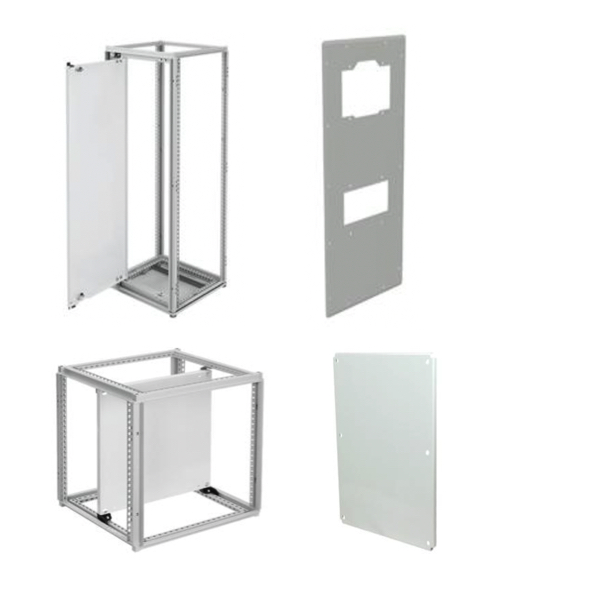
Enclosure backplates and panels are offset from the back of the enclosure allowing electrical devices to be mounted without compromising the integrity or NEMA rating of the enclosure. Most back panels come with pre-cut holes to match the mounting holes in the enclosure. These interior panels can also be removed or replaced, allowing the components to be easily worked on, without uninstalling the entire electrical cabinet. Back panels are made of steel, fiberglass, aluminum, wood, galvanized steel, painted steel, as well as composite materials. 

Enclosure gland plates are panels with a gasket. Gland plates provide a removable cable entry and egress, while still maintaining the NEMA rating of the enclosure they are designed for. In some instances, gland plates may be easier to drill or punch than the enclosure wall, and when used properly, may retain NEMA certifications that could be lost if done in the enclosure wall. Gland plates may be used to completely cover cutouts from additions, such as an air conditioner, that are no longer attached, or cover gaps created installing new external equipment that has a smaller connecting footprint.

Found 3886 items
Filters
Found 3886 items
Manufacturer
Adalet (12)
Allied Moulded (29)
Hoffman (2564)
Killark (40)
PCTEL (6)
Rittal (608)
Schneider Electric (460)
Stahlin (167)
Component
Adapter (5)
Adapter Gland Plate (4)
Adapter Plate (7)
Anti-Tip Plate (2)
Back Panel (21)
Back Plate (132)
Backplate (1149)
Backplate Mounting (5)
Baffle (7)
Barrier Panel (51)
Sub Component
Aluminum Backplate (42)
Backplate Full Panel (13)
Backplate Half Panel (12)
Cable Entry Gland Plate (1)
COMPACT Backplate (10)
Composite Backplate (13)
CONCEPT Conductive Backplate (43)
Concept Console Side Panel (2)
CONCEPT Steel Backplate (45)
Concept Swing-Out Panel (37)
Backplate Size
Full Height (438)
Half Height (24)
Enclosure Height
12" (1)
16" (2)
20" (2)
24" (3)
30" (2)
9" (1)
Enclosure Width
12" (1)
16" (2)
20" (2)
24" (2)
30" (2)
6" (1)
8" (1)
Enclosure Composition
Aluminum (1)
Polyester (1)
Steel (11)
Backplate Width
0.9" (1)
10" (16)
10.1" (1)
10.25" (4)
10.43" (2)
10.56" (1)
10.6" (3)
10.63" (1)
10.75" (10)
10.8" (3)
Backplate Depth
10" (3)
10.16" (1)
10.24" (1)
10.25" (6)
10.5" (5)
10.88" (8)
11.5" (1)
11.57" (7)
11.89" (14)
12" (3)
Backplate For Enclosure Height
10" (13)
10.03" (1)
10.23" (1)
10.24" (1)
11.8" (4)
11.81" (4)
12" (21)
13" (1)
13.8" (2)
14" (9)
Backplate For Enclosure Width
10" (20)
11.8" (4)
11.81" (5)
12" (35)
12.20" (1)
13.8" (2)
14" (7)
15" (2)
15.75" (3)
15.8" (2)
Backplate Composition
ABS Plastic (10)
Aluminum (81)
Carbon Steel (35)
Composite (13)
Fiberglass (26)
Mild Steel (35)
Non-Metallic (24)
Phenolic Resin (2)
Polycarbonate (9)
Stainless Steel (29)
Backplate For Enclosure NEMA Rating
Type 1 (64)
Type 12 (187)
Type 13 (105)
Type 3R (116)
Type 4 (40)
Type 4X (168)
Backplate Environment Rating
Indoor (62)
Outdoor-Indoor (206)
Panel Height
0.67" (1)
0.89" (6)
1.2" (10)
1.5" (1)
1.72" (1)
1.73" (1)
1.9" (5)
1.97" (1)
10" (23)
10.25" (3)
Panel Width
0.49" (2)
0.67" (1)
0.75" (6)
1.1" (1)
1.4" (1)
1.48" (1)
1.8" (1)
1.97" (1)
10" (25)
10.2" (3)
Panel For Enclosure Height
11.81" (3)
12" (2)
15.75" (2)
16" (6)
20" (6)
23.5" (1)
23.62" (2)
24" (8)
30" (7)
36" (7)
Panel For Enclosure Width
10" (2)
11.81" (3)
12" (12)
15.75" (1)
16" (6)
18" (12)
20" (10)
23.5" (1)
24" (24)
30" (7)
Panel Composition
304 Stainless Steel (7)
316L Stainless Steel (18)
Aluminium (5)
Aluminum (42)
Bakelite (5)
Carbon Steel (202)
Cellular Pu Foam (2)
Die-Cast Zinc (2)
Fiberglass (4)
Foam (1)
Panel For Enclosure NEMA Rating
Type 12 (9)
Type 13 (1)
Type 3R (1)
Type 4X (9)
Panel Environment Rating
Outdoor-Indoor (8)
(CL)
1 PACK = 10 EACH (3)
1 PACK = 2 EACH (7)
1 PACK = 4 EACH (2)
1 PACK = 5 EACH (4)
Rack Spacing
19" (2)
Rack-Frame Width
25.0" (2)
Rack-Frame Height
25.0" (1)
31.0" (1)
Rack-Frame Rack Units
11.0 (1)
14.0 (1)
Backplate Height
10" (11)
10.0" (1)
10.04" (3)
10.08" (1)
10.4" (5)
10.6" (6)
10.79" (1)
10.8" (3)
10.83" (2)
11" (1)
Gland Plate Height
0.16" (1)
10" (3)
10.1" (1)
10.24" (2)
10.63" (4)
10.85" (4)
10.98" (6)
11" (8)
11.22" (1)
11.7" (2)
Gland Plate Width
10" (16)
10.1" (3)
10.24" (3)
10.32" (4)
10.83" (10)
11" (5)
11.46" (1)
11.89" (3)
11.9" (3)
12" (17)
Gland Plate Fits Cutout Size
1000 X 400 mm (2)
1000 X 500 mm (2)
1000 X 600 mm (4)
1000 X 800 mm (3)
1200 X 400 mm (3)
1200 X 500 mm (2)
1200 X 600 mm (4)
1200 X 800 mm (3)
1600 X 400 mm (3)
1600 X 500 mm (4)
Gland Plate Composition
Aluminum (66)
Carbon Steel (7)
Fiberglass (11)
Mild Steel (40)
Non-Metallic (23)
Plastic (8)
Polyethylene Foam (4)
Stainless Steel (12)
Stainless Steel 304 (7)
Steel (348)
Line
AM-R Series (9)
Aria (29)
CF (32)
Classic Series (32)
Comline (18)
Compact (10)
CONCEPT (138)
Control Series (4)
Diamond (12)
Diamond Shield Series (25)
Normally In Stock
Schneider Electric NSYMP204 Electrical Enclosure Mounting Plate
Free U.S Ground shipping
$168.30
$140.25
Normally In Stock
Schneider Electric NSYMM128WH Industrial enclosure mounting plate
Free U.S Ground shipping
$384.29
$320.24

Panel Build Series Part 14: Drilling and Tapping

Drilling and tapping holes into a steel back plane for hardware attachment.

Take inventory of the tools needed for the job.

A metal punch is used to make a small divot in the metal so that the drill bit won't wander, a very sharp machine drill bit and a 10-24 tap. The size of the bit and tap will depend on the type of hardware being used to secure the din rail and wire ducting to the panel.

Punch to create divots on previously marked layout.

Always punch before drilling and make sure that the punch is in the center of the mark.

Drilling into the steel back plane.

Make sure that the drill bit is very sharp, use lubrication to prolong the life of the bit, place the bit into the punched divot and start drilling. Clean up any metal shards when drilling is complete.

Tapping the holes to create threads.

Make sure that the tap is very sharp and lubrication is used when tapping the holes. Do not over torque the tap which can cause it to break. Make sure that the tap goes completely through the hole until it turns easily to ensure that the holes have been properly threaded. Test the threaded holes with a screw. Clean up any metal shards. The back plane is now ready for mounting hardware.